Back to the Restored Rover Section
Please be aware that ECR is now a Defender repair and modification shop only.
We no longer work on Range Rovers, Discos or Series Rovers.
These pages are from work we did in the past and left up for your enjoyment.
1969 Series IIA 88
Coil chassis, restorations and upgrades
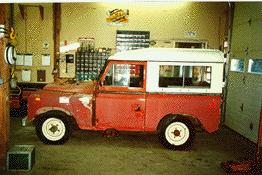
This 88 has come to us from New York for a full restoration and upgrades. It will be getting a new galv. coil chassis with 4 wheel disc brakes, and a nice HO 2.25 engine mated to the R380 5 speed and Series transfer case. It will also be getting some updates like inertia seat belts, a CD sound system as well as a complete rebuild t its former glory, with a new Bronze Green and Limestone paint job.

The first step in any restoration if to tear the Rover down to its smallest part. In this image you can see the 88 being taken apart. Each part is cataloged and evaluated for either replacement or restoration. Once the 88 is fully disassembled the body will be painted and the new galv. chassis set up.

In this tear down image you can see that this 88 has a lot of new body panels in store to get it back into shape. The white looking spots are large areas of "Bondo" or body filler covering years of damage. All these damaged panels will be replaced with new and then fully painted in the new Bronze Green color.

After the body work is removed the running gear is evaluated and sorted into items we will need and items that will be replaced. As we say to our customers during restorations in this phase, "It gets a lot worse before it gets better."
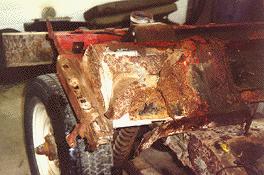
Speaking of "worse", this 88s bulkhead is in terrible shape. What you are looking at used to be the RH footwell and door post of this 88. The footwell is gone and has a piece of sheet tin riveted inside it, and the door post if rusted out completely. During removal of the bulkhead the foot that attaches to the frame outrigger fell off. It all looks bad, but fortunately this 88 is at ECR, so we can fully rebuild the bulkhead in our bulkhead jig, and it will be better than the day it came off the assembly line.

Here you can see the bulkhead has been stripped and blasted so that we can find all the rust. The rusted areas are cut away and the build up process with all new metal begins. Not much left is there?

In this image you can see that the ECR bulkhead jig has done its job perfectly. All the custom made panels are an easy fit and the bulkhead will bolt up to the 88 and everything will line up the way it should when it all goes back together. It is almost ready for painting in the new Bronze Green color.

A new addition to ECR's on going fight against bulkhead rust is the "dunk tank". We now fully submerge all the double layer sections of the bulkhead in a bath of rust resistant primer before we prime and paint the rest of the bulkhead. This helps the metal on the inside last as long as the metal on the outside, for the longest lasting bulkheads available.
Here you can see the primer running out of the inside of the bulkhead and door post after being "dunked".

We not only restore the bulkheads, but also the rear body tubs. This one will require a new floor that we seemlessly tig weld in so that the repair is invisible. We also use heavier gauge aluminum with box channel supports, and galvanized steel cross braces for the ultimate in strength and longevity. The rear panels on this 88 tub will also need to be replaced due to corrosion from the frame mounting tabs, but this tub will be better than new when we are done. You may pay less for your Rover's restoration at another Rover center, but you won't get our attention to detail and level of commitment to making these ECR restorations the best in the world.

Now that all the body panels have been restored and replaced as needed we move onto the new galvanized chassis. This image shows the new chassis ready for the restored parts. The axles have been set up with 4.70 gearing, but with 24 spline axles for added strength.

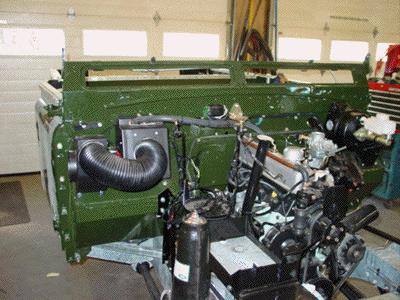
Here you can see that the restored bulkhead has been painted in the customer's new color choice, Bronze Green, and that the new engine and gearbox have been installed into the chassis. This 88 will be getting a H.O., or high output, 2.25 that is set up for unleaded fuel and will move the 88 along nicely.

In this image you can see that the running gear is starting to take shape. Notice that the fuel tank and exhaust system are in place, along with the new R380 5 speed gearbox. This is Rover's newest 5 speed and we mate it directly to the Series IIA transfer case and the H.O. 2.25. This gives you a fully synchronized 5 speed and eliminates the need for overdrives or other add ons. This is the same unit designed to handle the power from the 300 Tdis and V8s, so you know it will last a long time when mated to the 2.25 engine.

Here you can see the 88's body coming together. The restored rear body (new floor and supports with galvanized steel cross braces) has been installed as well as the new doors. The new galvanized trim is going on now with all the correct hammer rivets and the body is being lined up so that the doors all work perfectly. This shot also shows a good view of the 4 wheel power disc brakes on this Series IIA.
This images show the engine bay coming along. The high output Mansfield heater system has been installed as well as the new wiring harness and brake and clutch hydraulic systems.

Another nice upgrade we are installing on this 88 is the Defender 90 door panels that have been slightly modified to fit the Series IIA door system. They are very tough, long lasting, and give you a nice location for a 6" stereo speaker as well as a nice map pocket.

Here you can see the 88 a little further along. All the hydraulics are now done as is the majority of the wiring. The wires are pre-run for the 4 speaker CD stereo and all our usual restoration upgrades are being installed. Better door latches, inertia seat belts, new safety glass, Optima battery, etc. Now that the body lines have been finalized and the doors adjusted to open and close perfectly the work will begin on the roof and its new headliner and we'll be installing the front clip soon as well.

This image shows the level of detail we go to in an ECR restored engine bay. Notice how clean each and every nut and bolt is and that everything is double checked and safety marked so that we know each and every bolt is torqued to the proper setting. The RH wing is already in place and soon we'll be installing the radiator and getting the roof on the 88 so that we can begin road tests. Think all
"restorations" are the same?? We'll eat off our engine bays. Can you eat off the engine bay of other "restorations" you have seen??

Here you can see the 88 looking more and more like a Land-Rover. The front body work is in place, the rear roof sides have been fully rebuilt with all new galv. pieces, new window tracks, new glass where needed and all new body seals. A few more systems to hook up and the 88 will be ready for its initial tests. If you ever wondered what a brand new Series IIA looked like on the dealership floor, this Rover will show you, it is truly a work of art.
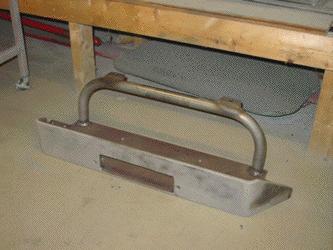
This image shows the custom winch mount we fabricated. It will hold the Warn 8000 winch, with the solenoid box relocated into the engine bay to keep the wiring under cover for a longer life. The bar behind will hold 2 PIAA 80 driving lights. It all bolts on to the new chassis and makes a strong and simple platform for both winch and lights. It will now be coated in epoxy primer and painted black for install onto the 88.

Here you can see the 88 really looking good. The newly restored roof section has now been installed, complete with new Badger Coachworks headliner. The side sills have been installed, the systems all hooked up and the 16" rims and new dual duty tires installed. Now we'll move inside the 88 and install things like the stereo install the Hi-Back seats, the rest of the interior trims and much more.

This image shows the painted winch mount now in place. Prior to paint we added two recovery points to the set up to make it really functional. The Warn winch and PIAA lights all make for a great looking and helpful addition to this beautifully restored 88.
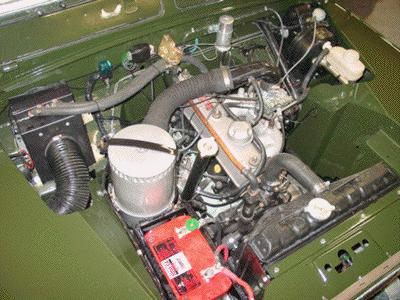
Here you can see the very nearly completed engine bay. It has every upgrade in the book from a Turner HO motor with unleaded head, to Optima battery and Mansfield heater system. They say a picture is worth 1000 words, so we'll just let you enjoy the image with just this reminder, "When we say restored... we mean it."

The interior of the 88 is also starting to take shape. The gauges have been restored as has every nut and bolt. The 88 will be getting many updates including a 6 disc CD sound system with 4 speakers and much more.
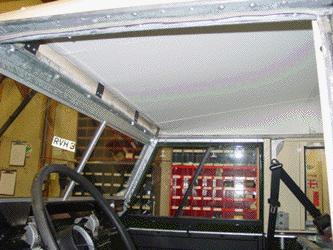
A full restoration means every piece, so we do it all. Here you can see the front section of the new headliner in place, no wrinkles, no folds. The side trims and headboards are still to come. All of the soft trim items used in ECR restorations come from Badger Coachworks, as they are the best in the business and the only products up to the level of a true ECR restoration. The headliner bows in this 88 were so badly rusted that we had to fabricate new units for the entire headliner. This time we made the pieces out of aluminum, not steel like the factory did, so that no discoloration or rust will ever harm the new headliner. We also use a synthetic foam backing, unlike the factory, that will not attract rodents, as those of your who have seen old original Rovers know, the mice love the headliner backing that the factory used originally.
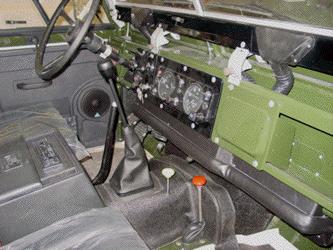
Here you can see the nearly completed interior. The 5 speed shift lever is now in place and all the shifter trims are installed. Badger Coachworks makes all our shifter tunnel covers that are correctly made for our 5 speeds and they also recover the trim on the heater distribution box for us. No detail is too small to get right. Isn't that what a restoration is all about? They only items left now are to clean and fully detail the inside, remove the plastic from the seats and install the floor mats.
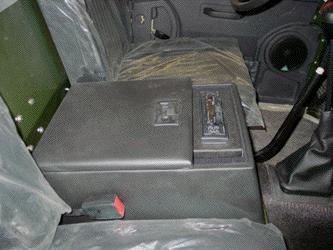
This images shows the new Rover cubby box installed with its Kenwood CD sounds system. In the background you can see the speakers nicely installed on the new door panels as well.

Open the cubby box and you get a lot of storage and you reveal the Kenwood 6 disc changer, so not only with this SIIA 88 ride and drive well with its coil chassis and 5 speed gearbox, but it will be a nice place to be with full sound insulation and a 4 speaker CD sound system.

This image shows a little more of the interior. The new side boards have been installed, as have the hi-back seats, inertia seat belts for safety and much more. How does the headliner in your Rover look? Like this?? If not then its time to call ECR and get that Rover back into shape.

Here is another shot of the headliner, visor board and the upper interior of this 88.

In the rear of this 88 we fabricated new rear light covers that serve the function to cover the backs of the lights like the old ones did, but they also hold the rear speakers. We added two 6" speakers to the rear of this 88 for great sound from the AM/FM/ tape/ CD system.

The rear of the 88 also has fully restored rear bunch seats. These seats can be folded up or down depending on if you want to carry people or gear.

This is the other seat in the up position. Notice that the new seats are sitting on the correct galvanized seat bases that have been fully rebuilt, just like the rest of the 88.

Here you can see the completed 88, now fully road tested and ready for delivery to the owner. This restored and upgraded 88 is now ready for anything and is built to better standards that any new Rover ever has been. If your Rover needs anything from an oil change to a full restoration, contact ECR. We'll be happy to help with any of your Land-Rover needs.